Friendly ARM Mini 2440 is a Single-Board Computer(SBC) built on 400
MHz Samsung S3C2440 ARM9 processor & 3.5” Touch screen LCD is
provided with mini 2440.
It has up to
256MB RAM & up to
1GB NAND Flash and
2 MB NOR Flash with BIOS.
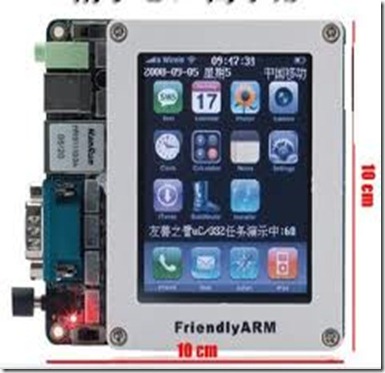

Friendly Arm Mini2440 is factory preloaded with
Linux Qtopia operating
system.This post is intended to revive the operating system in case of non booting of device.
Mini2440 has a Flash NAND ROM of 1 GB & 2MB NOR alternate
Bootloader.Top left is switch S2 for NOR/NAND boot
selection.To the bottom left is the power ON/OFF switch S1.Slide this switch to left for power ON..
NAND flash is used in all removable memory cards because of fast
write & erase operations (but slow random access).Because of NAND’s
multiplexed command address & data bus it requires lesser number of
pins for interface.
NOR flash memory has an advantage of fast Random access
ability.It allows for Execute in place (XIP) capability which is often a requirement in Embedded applications.
Friendly Arm uses both types of flash memory.
Friendly ARM is capable of running 3 types of Operating system,
Linux,Windows CE(Compact Edition 5.0 or 6.0) &
Android.
Friendly Arm boards are available with 1GB Flash
memory.Next to SD socket on mini2440 board you see Samsung NAND Flash chip.

As seen in above picture,S92ALU16J7OTF102 IC is the NAND flash chip
(1GB) which is the maximum available Flash memory for MINI2440.
K9K8G08U08 is NOR Flash IC.
In this post I shall demonstrate installation of Linux Qtopia on to NAND flash of Mini2440.
Mini 2440 comes preloaded with a SuperVivi bootloader in NOR
flash.It is used to install Operating system on to NAND flash.
SuperVivi is the BIOS for mini2440 & is used as a tool to download & burn OS image to the Flash onboard.
Your Host Computer operating system may be Windows 7 /XP or Linux
Ubuntu 12.04.It is easier to install Qtopia on FriendlyArm device
from a Windows 7 running PC.Later we shall see how to develop programs in Linux Environment & load it to Mini2440.
From the DVD supplied along with the Friendly Arm collect the required software.
Go to
/images/linux folder of DVD .
Or you can download it from my Skydrive
here.
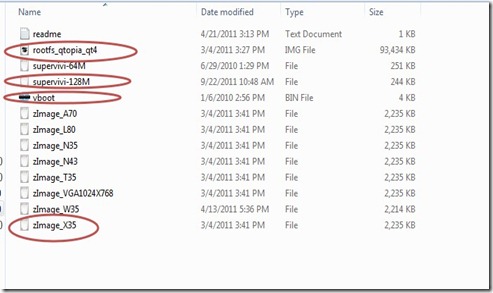
Copy the following software to a separate folder ,say mini2440 on Desktop :
1.
rootfs_qtopia_qt4 2.
supervivi-128M 3.
vboot 4.
zImage_X35
Keep S1 switch found at bottom left in OFF mode (slide to Right).
Connect the 5v/2A adapter pin to the power socket found above the S1 switch.
Connect the RS232 cable to the DB9 connector seen above the power
socket.Generally an USB to UART board is used to connect this RS232 to
USB of your PC.
Connect the USB-B (device USB) seen above the Ethernet connector to
another USB port of your PC.Remember to use the USB cable supplied along
with the device.I’ve wasted a whole day by using a cable bought from
market.USB download was not possible & finally using the USB cable that came along with the device solved the problem.
Keep the S2 switch found above the left corner in NOR mode.(slide the switch to left).
Open up the Device Manager to confirm that USB-UART board used to connect DB9 of Friendly Arm to USB of PC is
detected.If not detected,download the driver from
here & install it.

Now visit the download site of FriendlyArm
http://www.friendlyarm.net/downloads
Download the
USB driver & DNW tool .

Take a look at the files & software we collected & stored at mini2440 folder on desktop

Unzip the downloaded driver file
usb-downloaddr-setup_20090421.zip (1.49 MB) & double click on setup file.

Screenshots of driver installation are as below.


Open the Device Manager under the Control Panel.
Now
power ON the FriendlyArm by sliding S1 switch to Left.
If the drivers are installed,you see Friendly Arm detected under “Universal Serial Bus Controllers”.

We shall make use of a Terminal software to work with Supervivi BIOS .
Download Terminal software PuTTy from
here.
You can also use
Hyperterminal.But I prefer to use PuTTy as it is fast & reliable.
Open up PuTTy & in the welcome window do the settings as below :
1. Select Connection type as “Serial”.
2.Under Serial line enter the port number (in our case it is COM2).To
know the port no. allotted ,open up Device manager & under
Ports(Com&Lpt) you see the COM port number allotted to the USB-UART
board we have used to connect DB9 of mini2440 to PC.

3. Enter baud rate as 115200 under Speed.

4. Save the settings by providing a name mini2440, so that you can load it latter.
5.Now load the saved setting by selecting mini2440 & clicking “Load”.
A blank black window opens
up.Click Enter to see the FriendlyArm BIOS setup under Putty terminal.

Now Unzip the downloaded DNW tool .Double click DNW
At the title bar you see USB:x indicating that USB is NOT ready for transfer of data.

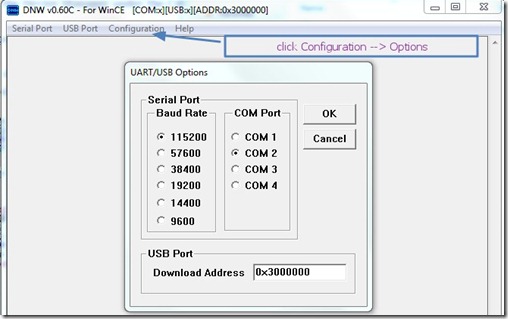
Click Configurations –> Options
Select COM port as COM2 (as seen in Device Manager) ,Baud Rate as 115200.
Download address should be 0x3000000.
Click Connect under Serial
Port.If Drivers are installed properly
USB:OK along with COM2,115200 is displayed on the title bar.

If USB:OK is not displayed ,check up the Device Manger for “FriendlyArm “
entry.Else you have to install the drivers again.
Caution : Remember to open the Putty terminal first & then fire up
DNW.If you keep open DNW & try to connect COM port through Putty,it will show error.
Here is the list of activities we’ve to do :
1. Press
x to Format NAND Flash.
2. Press
v to download Supervivi via USB. From DNW transmit supervivi_128m file.
3. Press
k to download the Linux Kernel. From DNW transmit zImage_x35.
4. Press
y to download yaffs root
image.From DNW transmit rootfs_qtopia_qt4 image.
Type x to start Formatting the NAND flash.

Type v to download the Supervivi file.Terminal will display “USB host connected.Waiting a download “.
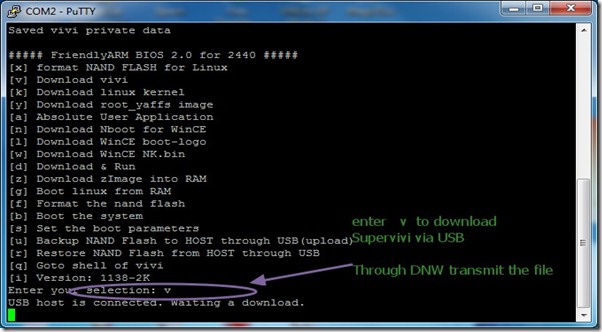
From within DNW select USB Port –> Transmit –> Transmit & browse to the folder
mini2440 where we collected all files & software.Select supervivi_128M file & click OPEN


Now type
k to download the Linux Kernel.

From DNW click USB Port—> Transmit –> Transmit & browse to select file zImage_X35.

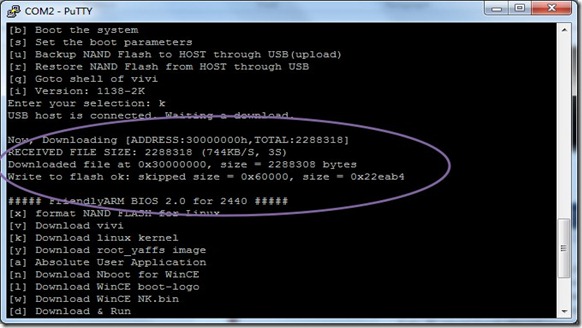
Type
y to download the yaffs root image which is the file system for QTopia.

From DNW select USB Port –> Transmit –> Transmit & browse to the image file
rootfs_qtopia_qt4 in the mini2440 folder


Now switch off the device by sliding S1 to right.
Slide switch S2 on top to NAND position (slide Right).
Power ON the device by sliding S1 to left position.
QTopia Linux will start booting on the device.


